Vegan Szechuan Green Beans with "Pork"

Simple and delicious and an ever so popular Chinese dish.  This side dish was described as “killer” and “amazing” by the lovely, handsome man I am lucky enough to call my husband.  “You would never be able to tell this is TVP instead of pork.  And this is soley due to this vegan wonderful product…

There is no joke about Goya’s Ham Flavored Concentrate!  If you want to emulate that smokey ham or pork flavor, do not pass up this product.  And, it is pretty easy to find.  I see it at literally every bodega around me.

This is a perfect side dish to accompany your favorite Asian entree.  A slightly salty, sweet and spicy recipe.  A generous tablespoon of sambal or fresh chili sauce gives it just enough heat to awaken and excite your tastebuds!  And, it is easy as can be.  If you do not have a wok, no worries, just use a saute pan and heat oil on high.

Vegan Szechuan Green Beans with “Pork”
Ingredients:
2 heaping handfuls of green beans, ends trimmed
1/2 c tvp
1/2 c water plus 1 goya ham concentrate package
1 garlic clove, minced
2-3 tbsp tamari or soy sauce
1 tbsp agave nectar
1 tbsp Sambal or chili paste
1 tbsp sesame oil (or 1/2 tbsp sesame oil & 1/2 tbsp chili oil)
Directions:
In a small sauce pan, bring the water with the “ham” concentrate to a boil.  Stir in tvp, turn off heat and let tvp rehydrate for about 10 minutes.
In the meantime, whisk together the soy sauce, agave nectar and sambal.  Set aside

In a wok, heat oil(s) on med-high, add in garlic and saute to for one minute,  Stirring frequentaly.  Add in green beans and toss them in wok for about 5 minutes or until they are slightly tender.  Toss in your sauce, mixing thoroughly, add in the tvp and mix everything together.  That’s it!  Enjoy!

Vegan Ginger Scented Cauliflower Fried "Rice"

I love the aromatics when I cook.  It is basically mouth watering love flowing in the air.  And, there is always something special about walking through the door and just smelling what is waiting for your taste buds.  Almost like that smell when you walk into a Whole Foods, but…oh wait, I still have money in my bank account because I use my local grocer (ok, fine…most of the time).

The aromas of ginger and garlic filled my kitchen, along with a touch of toasted sesame oil/chili oil.  At that moment, I knew this recipe was going to be fantastic.  Ginger root is one of my all time favorite ingredients.  I felt nauseous all day, so while prepping for this meal, I chewed on some ginger root.  Badda-bing-badda-bang….bye-bye nausea.  I also love taking a lemon-ginger-cayenne shot every morning as well!  I swear, it is a great way to start the day!

The use of cauliflower “rice” is similar to my Moroccan Stew with Cauliflower “couscous” recipe, except I did not use a food processor this time.  I did not want the texture to be as delicate, and wanted larger, rice-like peaces, so I manually grated the cauliflower to resemble more of a piece of rice. 

Vegan Ginger Scented Cauliflower Fried “Rice”
Ingredients (yields 3-4 servings)
1 small head of cauliflower, grated
1 c dried shitake mushrooms
1.5 c vegetable or mushroom broth
2 carrots, shredded or grated in food processor
1/2 c shelled edamame (cooked)
1/2 block extra firm tofu, cubed
3 scallion chopped (save the green parts for garnish)
2 garlic cloves, minced
1/2 inch piece of ginger root, minced
1/2 tbsp sesame oil
1/4 tbsp chili oil
1 tbsp soy sauce (possibly more accordingly to taste)
Directions:
In a small pot, bring broth to a boil and add in dried shitake mushrooms.  Turn off heat and let the mushrooms rehydrate in the broth for about 20 minutes, maybe 30 minutes.  Dried shitakes tend to be hard and chewy if you do not let them soak long enough, so give them a try before you are done soaking.   Once they are nice and soft, strain them in a collander and set aside.  
Heat sesame oil and chili oil in a wok (or large pan) and saute ginger and garlic for about a minute/  Add in the grated cauliflower, chopped green onions and shredded carrots.  Saute veggies for 3-5 minutes, stirring frequently.  Add in more sesame oil if need be.  Add in soy sauce, tofu, edamame and mushrooms.  Add more soy sauce if you wish.  Serve when heat

Vegan Doenjang Jjigae (Vegan Korean Soybean Paste Soup)

If you never have heard of this soup or are curious as to what it tastes like, think along the lines of miso soup, though this soup is made with fermented soybean paste.  Like miso paste, soybean paste is quite salty.   Keep this in mind while preparing.  Taste often to achieve your desired sodium level.

If you are wondering where to purchase this paste, I would think it would be where you traditionally find miso paste in your local market.  I personally bought it in a specific Asian Mart.

Traditionally, this korean soup has anchovies or clams.  Clearly I eliminated them, though otherwise stuck with authentic ingredients, including kelp, enoki mushrooms, zucchini and tofu.  Don’t be afraid of this soup!  The name may be tricky to say, but the cooking process is easy as can be.

Plus, this is super super healthy!  Out of all fermented foods, soybean paste has shown to be the most effective in treating cancer.  Now that’s pretty cool!  It also aids in digestion, lowers blood pressure, prevents osteoporsis and heart disease, and strengthens the liver.  Now those are just some of the benefits!

So what are you waiting for?  Good tasting and good for you!

Vegan Doenjang Jjigae (Korean Soybean Paste Soup)
 Ingredients:
4 c vegetable broth
3-4 tbsp soybean paste
1 garlic clove minced
1 tbsp korean chili paste (gochujang)
1 potato peeled and cut into cubes
1 zucchini washed and sliced
1/2 enoki muchrooms or mushroom of choice
1/2 package tofu drained and cut into cubes
1 jalapeno seeds removed and sliced (optional)
2 tbsp chopped scallions
 1/4 c wakame or dried kelp
1 tsp sesame oil

Directions:
Pour sesame oil into pot and add in minced garlic.  Saute for about 3 minutes, then add in vegetable broth and spoon in chili paste and soybean paste.  Add in potatoes and bring the broth to a boil.  Stir and continue to boil the potatoes for about 6-7 minutes.  Add in enoki mushrooms, cubed tofu, wakame and jalapeno.  Cover and turn to lower and let simmer for about 5 minutes.  Garnish with scallions.

The Best Vegan Curry! Vegan Turmeric Root – Coconut Currry with Calabash

Now this is a must have.  No joke here!  It is rich, creamy, spiked with turmeric root juice and just enough heat to get you excited.

So, in my opinion, calabash tastes almost exactly like Thai eggplant.  They are around the same shape and size, have that earthy, subtle flavor and can easily absorb any sort of liquid or oil.  The only real difference, as far as I can tell, is that the calabash is green, whereas the eggplant is purple.  They both also have the tiger stripe like characteristics in appearance.

 Unlike some of my recipes, this one is fairly easy.  Though, having a juicer is key here.  If you do not have one, do not fret!  Simply crush and grind our turmeric root with a mortar and pestle or blend it along with your coconut milk. The goal here is to extract as much of the turmeric root juice out to really pull out that flavor and to also give your curry that beautiful orange color.

Feel free to add more vegetables if you wish.  I decided to focus on the calabash as my main veggie because the texture and flavor is simply delicious. 

Vegan Turmeric Root – Coconut Currry with Calabash
Ingredients: (serves 2-3)
6-8 calabash, washed and cut into quarters
juice from a handful of turmeric root (to equal about 2 tbsp of juice)
2 tsp fresh ginger, minced
2 garlic cloves, minced
3-4 dried Thai chilis
1 can light coconut milk
s+p
1 tbsp evoo
Directions:
Heat evoo on medium in saute pan and saute ginger and cloves for roughly 3 minutes.  Add in calabash pieces and saute for another 3 minutes (add in more evoo if need be- calabash absorbs liquid quickly).  Calabash should be slightly soft.  Add in coconut milk,  turmeric root juice and seasoning to taste and dried chilis.  Cover and let sit on low for about 20 minutes.  
Serve with rice.  Yummy!!!!!

Vegan Banana Flower Salad (Goi Bap Chuoi Chay)

Slow week at work means busy time in the plantry for this little lady.  After all, my energy has to be exerted in one way or another.  And, I thought that I should stop at two workouts today.  So that means I have been cooking/fermenting for hmmmm, lets see……about 7 hours.  Of course there was a bit of downtown, which I actually spent researching some of the odd items I picked up at the International market.

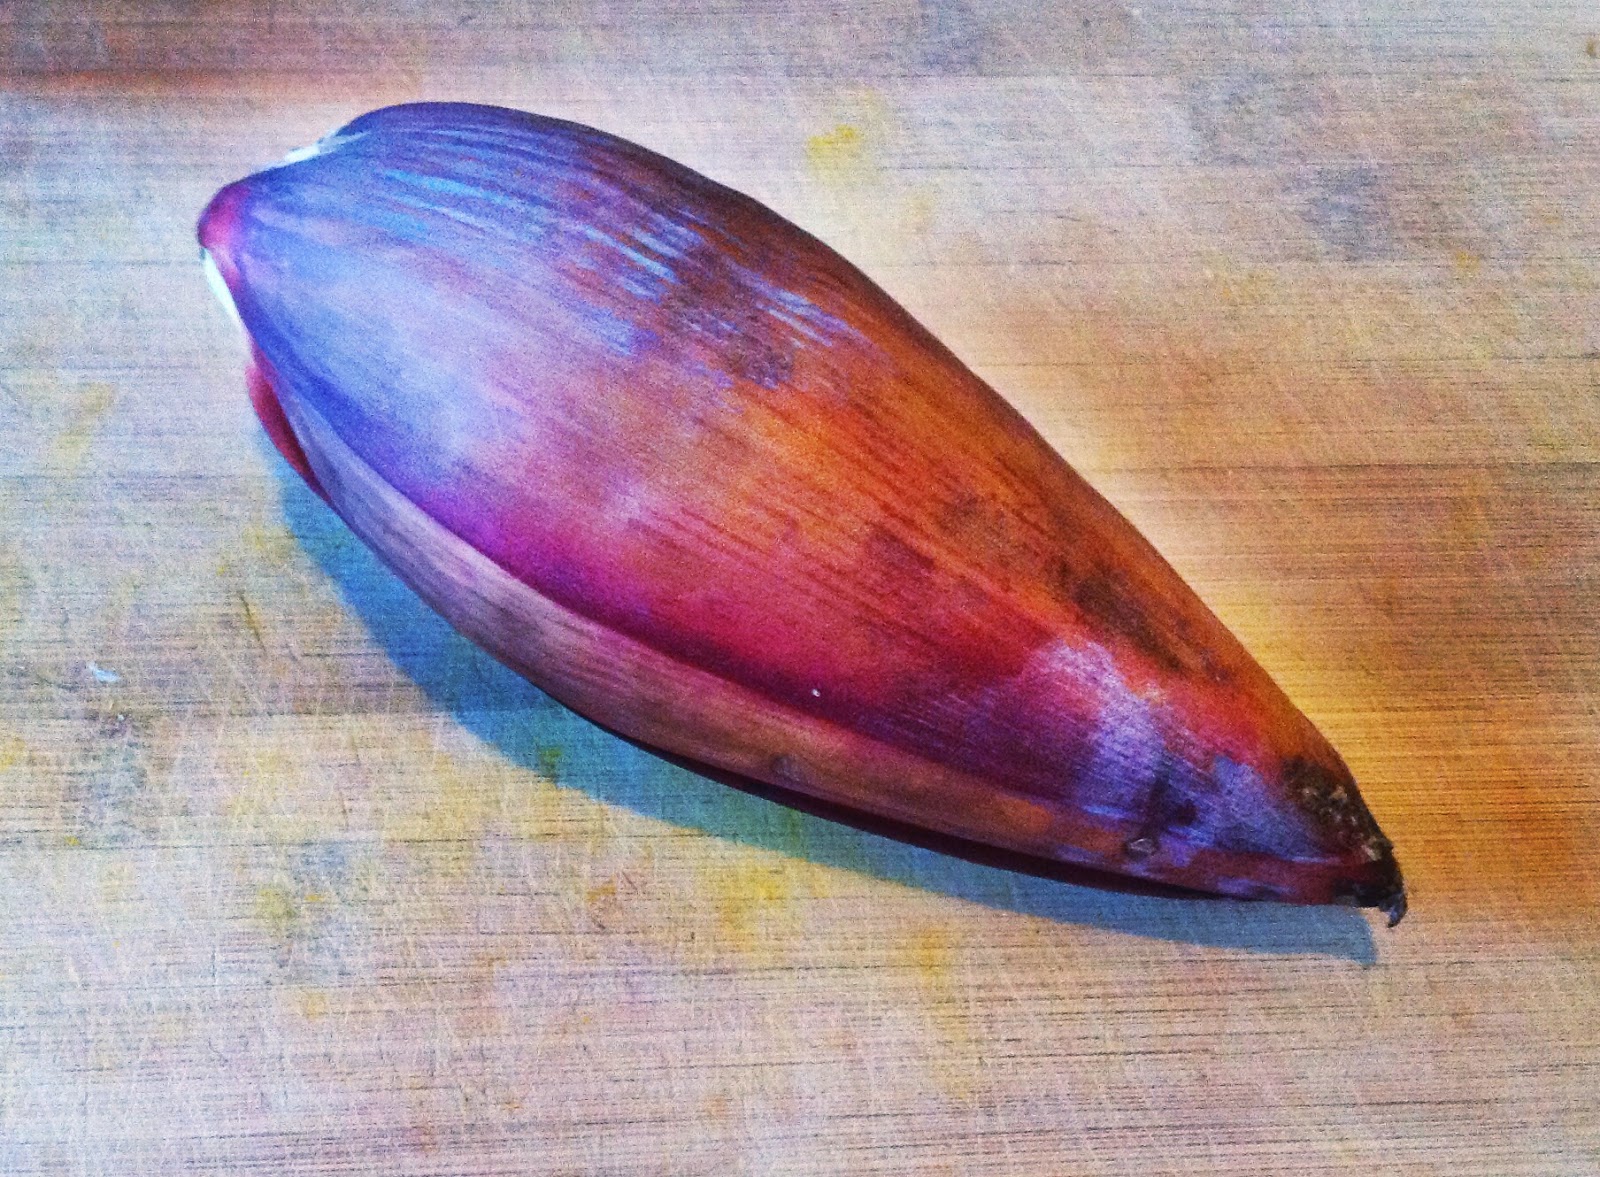
I picked up a banana flower a few days ago and was really looking forward to working with this little guy.  Usually if I have never worked with something before I will get a pretty small quantity, just in case it is not my cup of tea.  I hate for things to go to waste!  But, next time I will definitely grab more than one banana flower!

So, yes, banana flowers are really the flowers of the banana and used in South Asian and Southeast Asian cuisine.  I wouldn’t recommend eating them raw due to the bitter taste and strange chalky texture.  But, after lightly boiling them, they become soft and have a subtle flavor somewhere in between an artichoke and boiled shitake mushroom.  Keep in mind you do NOT eat or cook with the leaves, you peel them and that is where you find the “flower” (as shown in the picture).  Although, the leaves are a nice vessel to serve the salad in!!

 So, this is my vegan version of what is known as “Goi Bap Chuoi Chay”, which literally translates to banana flower salad.  Traditionally it contains prawns, fish sauce, thai bird chili, amongst a few other ingredients.  Either I did not have them, or clearly cannot eat them.  So this is my wonderful version of this bright and tasty Vietnamese salad.

Vegan Banana Flower Salad
Ingredients/Directions: (serves 2)
for the salad:
 1 banana flower, flower removed
1/2 c sliced shitake mushrooms
1 lime juiced

salt

1/4 c mixed red & green bell pepper, thinly sliced (i used mandolin)
1/4 c peanuts, lightly smashed
1 tbsp thai basil chopped (sub regular basil if cannot find)
1 cloved pickled garlic minced
1/2 tbsp ginger minced 
1 tbsp cilantro chopped
1 sliced shallot (optional)
oil for pan frying (optional)
While removing the banana flowers from each pulled back leave, toss into cold water immediately.  This prevents them from browning.  Once all the flowers are removed, boil a pot of water with lime juice and salt.  Toss in drained banana flowers and your sliced shitake mushrooms.  Cover and turn on low and cook for roughtly 20 minutes.  After the 20 minutes, strain and rinse with cool water.
 In meantime, prepare the rest of the salad.  In a bowl, mix together sliced peppers, thai bail, pickled garlic, ginger, cilantro and half the peanuts. Do NOT add in shallots yet (you will pan fry shallots at the end…note this is optional)  Add in mushrooms and banana flower once boiled and rinsed.
  
Now work on your dressing…
for the dressing:
1 tbsp sambal (or something similar to chili sauce)
2 tbsp tamari or soy sauce
1 tbsp lime juice
1 tbsp coconut milk
1/2 tbsp agave nectar
1-2 tsp sesame oil (optional)
Simply whisk all ingredients together and toss over salad. 
If you choose to do crispy shallots, heat about 1/2 inch of oil in a small frying pan and fry.  Top your salad with the remainder of crushed peanuts and crispy shallots.  Enjoy!

We are Rolling Again!…..Truffled Shitake Maki with Microgreens

If you couldn’t guess already, I made the last few Japanese recipes all the same night.  Though, after cooking for hours and then posting maybe one recipe, I get either writers block or just want to relax.
I never want to post something that is too trying and not genuine!  Plus, would you really want to read it???  That’s what I thought!

So, I received the ultimate compliment when it came to this vegan maki roll.  “Oh my (bleeeeeeep), why can’t restaurants serve rolls like this?  Maybe then I will crave some vegan sushi.”
 (Insert a big ole’ blushing dimple face here).

But in all seriousness, this is a dream come true for your taste buds, especially f you have a love and/or obsession for truffle oil and/or shitake mushrooms.  And, if you love both, this is a gosh darn double wammy, dream come true!

Opposed to my last sushi recipe, where we rolled an inside out roll (rice on the outside), we are going to start with the nori as the first layer.  Then you will lightly spread your sushi rice evenly on the nori.  Remember, lightly oiling your hand helps to prevent rice to sticking to your hand.                  

Truffled Shitake Maki with Microgreens
 

Ingredients:
Dried shitake mushrooms
1 cup broth (or water) to soak mushrooms in
1/4 tbsp truffle oil (or more to taste)
1/4 c microgreens
1 tsp rice wine vinegar for the greens
nori
sushi rice

Directions:
Soak your dried shitake mushrooms in hot broth or hot water for at 30 minutes.
In the meantime, prepare your microgreen salad.  Simply lightly toss the microgreens with rice wine vinegar and a touch of truffle oil.
Opposed to my last sushi recipe, where we rolled an inside out roll (rice on the outside), we are going to start with the nori as the first layer.  Then you will lightly spread your sushi rice evenly on the nori.  Remember, lightly oiling your hand helps to prevent rice to sticking to your hand. 
Place rehydrated shitake mushrooms down the middle of the rice and nori, drizzle with some truffle oil, and then add in the microgreens.  Roll accordingly, cut into pieces and serve!

Vegan Gyu-Negimaki and Gyu-Asaparagus….Vegan Beef wrapped Scallions and Asparagus

If you are familiar with Japanese cuisine, I am sure you have seen gyu-negimaki on the menu.  And, if you are not savvy in Japanese food items, it is simply boiled beef, marinated in teriyaki sauce and wrapped around scallions.   But I also wanted to play around with the recipe and use asparagus as well. 

Clearly we are not using beef here.  Instead, you are going to use boiled seitan (or your favorite store bought seitan).  If you are gluten free, try marinating some tofu skins instead.  Start off with this simple seitan recipe if you choose to make your own. 

These are great to accompany some traditional or not-so-traditional vegan sushi rolls.  Also great for fingerfoods, picnics, etc. 

 Vegan Beef wrapped in Scallions and Asparagus

Ingredients/Directions
 simple seitan recipe
1/4 c teriyaki sauce
2-3 bunch scallions
asparagus with the base cut off
sesame seeds (for garnish)

Cut seitan into very thin strips.  Place the strips in the teriyaki marinade for about 20-30 minutes. 
Once marinated, remove the strips and gently pat with paper towel, and turn heat on a saute pan or turn on your brindlille/foreman grill.

  Wrap 2 pieces of asparagus of 3 pieces of scallions with the seitan strips.  Cut the scallion/asparagus to the size of the seitan strip.  Repeat until your vegetables are wrapped.  You may need a toothpick to secure. 

Quickly brush any additional marinade on your wrapped veggies and saute or grill for about thirty seconds.  Garnish with sesame seeds.

Serve hot or room temp!

Stop. Drop. And Roll!…..Vegan Crispy Sweet Potato Roll

I used to frequent a popular byob sushi spot in Chicago somewhat often.  Ever since, I have wished that every sushi joint carried that ever so memorable roll.  Being vegan, it was a delightful change rather than the typical veggie roll.  Come on peeps!  You can be creative with a veggie maki roll!

So basically this is a tempura battered sweet potato roll with a touch of heat.  I did not have soda water so I strayed a bit from a traditional tempura batter recipe.

For step by step directions, visit my standard veggie roll recipe.  But some tips not to ignore are the follows: 1.) Make sure you cover roll sushi rolling mat with a large zip lock back or cover in plastic rap.  2.)  Oil your hands when laying down the rice will prevent you having a sticky mess on your hands.  3.)  Rice wine vinegar plays an important part when preparing your sushi rice!

Vegan Crispy Sweet Potato Roll

Ingredients:

2 c cooked sushi rice
nori sheets
1 sweet potato
1 tbsp agave nectar
1/2 tbsp chili oil

for the batter:
1/2 c flour
1/2 c cornstarch
1 tsp baking sold
1 tsp baking powder
2/3 c cold water
1-2 c panko crumbs

enough oil to pan fry battered sweet potato.

Directions:
Start boiling a pot of water.

Wash, scrub and peel the sweet potato.  Very carefully, cut the sweet potato lengthwise into about 1/4 inch thick pieces. (think about how they should look while you are rolling your maki- that may help).
 At this point, your water should be boiling.  Steam the sweet potato for about 5 minutes or until semi soft.  You do not want it mushy!  Set aside to cool.
In a small bowl, whisk together the agave nectar and chili oil.  Brush the marinade on the sweet potato.  Allow to cool completely.

Once cooled, make your batter.  mix together everything but the panko crumbs.  Make sure the mixture is pretty thick. Then, set up a plate with your panko crumbs laid out.  Drench each slice of marinated sweet potato in the batter and then cover completely with panko crumbs.  Repeat until each slice of potato is coated.

Heat about an inch of oil in pan fry your battered sweet potato pieces until golden brown.  Remove from oil and place on paper towels to dry.  (surprisingly crispy and NOT greasy).

Now it’s rolling time.  Flatten out rice on your plastic covered, place nori on top, then add in the crispy sweet potato strips.  Roll accordingly.  Repeat until the sweet potato strips are finished.

Serve with a spicy mayo.  Happy eating!

Yum yum in my Tum Tum!!!! Vegan Tom Yum Soup

Thank goodness it is finally starting to feel like spring!  See ya later heavy, hearty soups…hello fresh new flavors!

Fresh vegan spring rolls and a bowl of veggie tom yum soup???  Um, yes please!  That was exactly what I used to order for delivery years ago from our favorite Thai place in Chicago.  The two go perfectly together….fresh, zesty and vibrant!

And then, I had an epiphany….why am I spending so much money on take out when I can do it just as good (if not better) myself?  Bye bye $35 delivery and hello homemade Tom Yum Soup!!! 

Basically, there are two variations to this….you can either have a clear broth with just lemongrass, galangal (or ginger), garlic and chili paste,  or you can add a touch of coconut milk.  Coconut cream gives it that creamy texture and savory slurp.  And who doesn’t love a slurp like that???

Have fun with this recipe!  There are no wrong or right things to put in it!  Go crazy if you wish!   Though, tofu, exotic mushrooms, cabbage and snap peas are a must in my book!

Vegan Tom Yum Soup
  
Ingredients: (yields 4-6 servings)
6 c veggie broth (or water)
2-3 stalks lemongrass
1 tbsp fresh minced ginger
2-3 cloves minced garlic
1/4 c coconut cream
1-2 tbsp chili paste (depending on taste)
1 thai chili, minced (or 2-3 dried chilis)
1/2 c exotic mushrooms (I used beech mushrooms)
1 package tofu cut into cubes
2 vine ripe tomatoes chopped
1/4 c chopped broccoli
1 handful snap peas
2 carrots shredded 
1-2 tbsp soy sauce
1 lime juiced
cilantro for garnish (optional)
1 tbsp evoo
Directions:
Take your lemongrass and peel off the outside skin.  Cut the stalks into 1/2-1 inch pieces…the lemongrass is what is going to give the soup that bright and fresh taste (note do not cut into small pieces, as you will be discarding the pieces later on).
In a large stock pot, heat evoo and saute garlic and ginger for about 2 minutes.  Add in vegetable broth, along with lemongrass pieces and chilis and bring to boil.   Cover and simmer for about 10-15 minutes. 
Taste your broth at this point.  You should get that bright flavor of lemongrass.  If it is not apparent, allow to simmer for another 10 minutes.  With a strainer, remove the lemongrass pieces.  Stir in chili paste.  Add in your veggies and tofu.  Note that you do not want the veggies to sit in hot broth for too long.  You want your green vegetables to remain vibrant and fresh!
Serve with cilantro as garnish and rice!  
P.s- don’t forget your spring rolls!

Fermentation Craze!…..Vegan Fermented Mung Bean Cakes

Yeah yeah, I know….I feel like when people hear the work “fermented” they kind of cringe.  I am not really sure why.  Maybe it is an acquired taste???  After all, I hated kombucha the first time I drank it.  It was pungent, fizzy and just didn’t appeal to my palate.  But, as we grow, we evolve, as do our taste buds.

Mung beans are most prominent in Asian/Indian cultures and high in nutritional value and content.

 And when fermented, that value increases even more!….rich in enzymes, improves digestion, increases flavor and shelf life, restores proper bacteria balance in your tummy, increases nutrients….I mean the list goes on.

Unlike other fermentation processes, this one is quite simple: soak, blend, soak again….just about one and a half/two day span. 

This recipe is non-traditional to the korean style fermented mung bean pancake.  Though, I will do another version of the pancake that is inspired by the korean recipe.  Here we are not using kimchi.  Instead, I used fresh vegetables to mix into the fermented and blended mung bean mixture.

This is after the beans have soaked and blended and 
fermented for another 12 hours.                                
 Vegan Curried Fermented Mung Bean Cakes                         
 Ingredients:
1 c mung beans, rinsed
1 mason jar or something similar to soak beans
2 scallions chopped, using both white and green parts
1 carrot shredded
1/4 c finely chopped napa cabbage
1 garlic clove minced
1 tbsp ginger minced
1/2 tbsp garlic chili paste
1/2 tssp tamari
salt to taste
1 tbsp evoo or sesame oil
Directions:
Rinse your mung beans and discard any that look bad or discolored.  Place mung beans in a mason jar and cover with about double the amount of water (the beans will expand over night).  Make sure you used pure, filtered water!  Cover with a cheese cloth (or paper towel if you do not have) and twist on top.  Let sit out on counter overnight.  
In the morning, rinse the mung beans (you may want to save your fermented liquid for the next time you ferment because you now have bacteria in the water and will speed up fermentation process!).  Transfer beans to food blender and add a few tbsp of water, just enough to blend but you do not want smooth!
Transfer to a bowl or container, cover and let sit to ferment for about 6+ hours.  After those six hours, it should look a bit foamy and bubble- I suppose that is the best way to describe it.
Now, transfer the blended fermented mixture in a bowl and add all above ingredients, except for the evoo.  Mix together and season to taste.
Heat evoo or sesame oil on medium heat.  Add about 2-3 tbsp to the saute pan for each pancake.  Cook each side of the pancake for about 3-5 minutes or until crispy and brownish.  Continue until batter is done.
Serve with a spicy Asian mustard, Sriracha or sweet-soy/scallion sauce!